
The Ultimate Fix: Repairing Extremely Slow WordPress in Docker on Windows
If you develop a WordPress site using Docker on a Windows machine, you have likely experienced a frustrating surprise: your hardware boasts 16 CPUs, 32 GB of RAM, and lightning-fast NVMe SSDs, yet a simple local page load takes 5, 10, or even 15 seconds.
You allocate more resources in Docker Desktop, you install caching plugins—but nothing helps. The local development environment feels sluggish and unresponsive.
The problem lies neither in your hardware nor your code, but in an architectural bottleneck between Windows and Linux. Here is the complete, field-tested, step-by-step guide to bring your load times down from seconds to milliseconds.
The Problem: The NTFS Translation Bottleneck
When Docker Desktop runs on Windows and you mount your project directory from your C:\ or D:\ drive into the container (a so-called Bind Mount), two entirely different file systems are forced to communicate.
A modern WordPress installation—especially when combined with complex page builders like Divi or numerous plugins—loads hundreds of tiny PHP, CSS, and JS files per page request. Every time the web server requests one of these files, Docker has to translate that request across the boundary from the Linux container (ext4) to the Windows host (NTFS).
This translation layer is microscopically slow. Multiplied by thousands of file accesses per page load, performance completely collapses. Neither CPU nor RAM can brute-force their way through this purely software-based bottleneck.
The Perfect Solution: Native WSL2 Architecture from the Ground Up
To completely eliminate this bottleneck, the translation layer must be removed. Your project files must no longer reside on the Windows partition; instead, they must operate directly within the native Linux file system of the Windows Subsystem for Linux (WSL2).
Step 1: Install a Real Linux Environment (WSL2 & Ubuntu)
First, you need a fully-fledged Linux environment on Windows.
- Open Windows PowerShell as an Administrator.
- Run the following command to install WSL and the default Ubuntu image:
wsl --install -d Ubuntu - Restart your computer after the installation is complete.
- After restarting, a console-based terminal will open where you can set up your desired Linux username and password.
Step 2: Link Docker Desktop with Ubuntu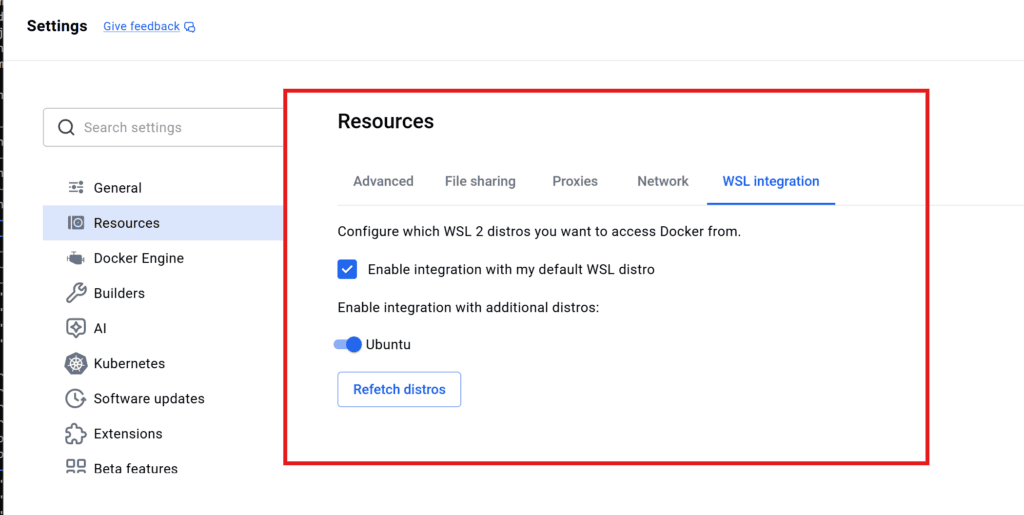
By default, Docker Desktop uses its own isolated, minimal distributions. We need to tell the application to connect to your new Ubuntu environment.
- Open the Docker Desktop application on Windows.
- Click the gear icon (Settings) in the top right corner.
- Navigate in the left menu to Resources -> WSL Integration.
- Check the option "Enable integration with my default WSL distro".
- In the list below, toggle the switch for Ubuntu to the ON position.
- Click Apply & restart in the bottom right corner.
From now on, the Docker engine is seamlessly integrated into your Ubuntu file system.
Step 3: Move Your Project to the Linux File System
Your project files can no longer be located in paths like C:\Projects. They belong in the home directory of your Linux user.
- Open the Ubuntu terminal from the Windows Start menu.
- Navigate to your personal user directory:
cd ~ - Open the Windows Explorer directly from Linux using the following command (note the required dot at the end):
explorer.exe . - A standard Windows window will open displaying the Linux path (e.g.,
\\wsl.localhost\Ubuntu\home\your-username). - Copy your entire WordPress project folder from your Windows hard drive into this window.
You should set the permissions:
sudo chown -R 33:33 ~/yourpath/wordpress/html
sudo chown -R 999:999 ~/yourpath/wordpress/db
Step 4: Use Relative Paths in docker-compose.yml
Since the files now reside natively in the Linux system, your docker-compose.yml no longer requires absolute Windows paths or /mnt/c/ mounts. You can now work with clean, relative paths:
services:
  wordpress:
    image: wordpress:latest
    ports:
      - "80:80"
    volumes:
      # Points directly to the local subdirectory in Linux
      - ./wordpress/html:/var/www/html
      - ./wordpress/php.ini:/usr/local/etc/php/conf.d/uploads.ini
In your Ubuntu terminal, navigate to your project folder (cd ~/your-project-folder) and start the containers:
docker compose up -dStep 5 (Optional): Solve the Permission Trap (403 Forbidden)
After copying files via Windows Explorer, Apache often blocks access with a 403 Forbidden error. This happens because Windows assigns the local Linux user or root as the owner of the files. However, the Apache web server inside the official WordPress container runs under the strictly isolated system user www-data.
If www-data does not own the files, the server refuses to serve them, and plugins (like security firewalls or caching tools) are blocked from writing to directories.
With your containers running, execute these three commands in your Ubuntu terminal to fix the permissions through the container:
1. Transfer ownership to the Apache user:
docker compose exec wordpress chown -R www-data:www-data /var/www/html2. Set standard directory permissions (755):
docker compose exec wordpress find /var/www/html -type d -exec chmod 755 {} \;3. Set standard file permissions (644):
docker compose exec wordpress find /var/www/html -type f -exec chmod 644 {} \;The Result
Once the permissions are correct and the files are served directly from the native ext4 file system of WSL2, the translation layer completely disappears.
The Docker engine accesses the files without delay and optimally utilizes your system resources. Local page loads, backend interactions, and plugin activations respond instantaneously—exactly as you would expect from a dedicated Linux production server.